Tuesday, September 25, 2012
Vintage Sheet Music Wreath Tutorial
Posted on 3:17 PM by follow me

Here's what you need:
{foam wreath
{cream ribbon
{glue gun
{vintage sheet music
{masking tape
{a small cup
That's it!
Let's get started.

You could use any size foam wreath but the only one the dollar store had the day I went was this really wide one, so...

I just cut it right in half with a knife.

If you buy a thick one like me, just save the other half for when you want to make another book page wreath. Trust me you will--they're addicting.
Wrap the wreath with a wide ribbon, glueing occasionally as you go. Or you could skip this whole step, especially if your wreath is white or cream.

This one was made out of florist foam and flaked every time I touched it so I definitely wanted to wrap it.

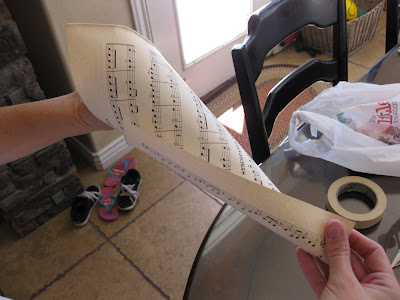
Now tear out about 50 pages of vintage sheet music. This is where it gets really fun. Once you get the idea of how to form each sheet into a cone shape it goes really quick.
This is how you do it:
Take a sheet and place your fingers on the two corners on the long side of the paper.

Keep your left hand still and with only your right hand wrap that corner around

continue to wrap in a forward motion

twist

twist

twist

keep twisting

Now twist your left and right hands in opposite directions to tighten the cone.

You can twist a lot to make a skinnier cone

or twist less and leave the cone opening bigger. Then secure with a small piece of masking tape.

I used a combination of skinny and big ones.

Once you have a big pile of these you are ready to glue.

Put your cup right in the middle. This will help you get a nice size circle opening in the center. You can vary the cup size depending on how big or small you want the opening to be.

Go all around the wreath hot glueing a single layer of cones to the wreath form. Don't worry if there are spaces or if it doesn't look perfect, this layer will be covered up.
Continue with a second layer.

Hang using a piece of ribbon or fabric threaded around the back of the wreath form.

Right now my wreath hangs simply from a small nail but I envision it one day hanging in the middle of a shabby door or gate hung just above the piano.

Subscribe to:
Post Comments (Atom)
Read more in vintage network:
Free vintage,
Vintage theme,
Style web world,
Vintage web pages,
Land of fashion,
Home shopping network,
Vintage plus,
Vintage articles,
Style articles,
Girls boutique
Free vintage,
Vintage theme,
Style web world,
Vintage web pages,
Land of fashion,
Home shopping network,
Vintage plus,
Vintage articles,
Style articles,
Girls boutique
Popular Posts
-
It is hip to be square dear readers...you heard it here! Last weekend I was asked by Motorola Flipout to style a model for the Geek Chic ...
-
Don't forget to pop over and leave a comment so that Andrea @ VINTAGE BELLA will know you want to "SHOW YOUR CROWN" on June 10...
-
I gave Kae an assignment, to take TONS of pictures of her Christmasy home...and did she ever!!! So, now we can all take a Christmas tour of ...
-
Continuing on my accessory theme, I just added a bunch of pretty vintage gloves to my website! They all look like they've hardly been wo...
-
Miss me? Miss you. I didn't know I was taking a blog break but here we are. My break will probably continue until my house empties out c...
-
Happy Halloween vintage ladies! I hope that some of you dress up this year since I'm missing out! I will however, make every effort to w...
-
Listen up! I know I have bored many of you to tears harking on about the new TV mini series "The Kennedy's", but I cannot cont...
-
Maddie's driving. DRIVING! All by herself. Going out into the world. Alone. Without her Momma beside her to keep her safe. And she has f...
-
So I had the HTC Hero mobile phone for over two weeks...oops. Was supposed to be two weeks exactly. You might remember me bothering you wit...
-
I have it on good authority that the new Holiday with Matthew Mead magazine will soon be on it's on its way to those of you that ordere...


No Response to "Vintage Sheet Music Wreath Tutorial"
Leave A Reply